Friday, April 30, 2010
Hyper-V Best Practices Analyzer
http://support.microsoft.com/kb/977238/en-us
Monday, March 8, 2010
Hotfix : Windows 2008 R2 + Hyper-V + Intel Nehalem = Blue Screen
http://support.microsoft.com/default.aspx/kb/975530
Before applying the Hotfix to your platform take into account the warning from MS :
Apply this hotfix only to systems that are experiencing the problem described in this article. This hotfix might receive additional testing. Therefore, if you are not severely affected by this problem, we recommend that you wait for the next software update that contains this hotfix.
Monday, March 1, 2010
Windows 2008 R2 Migration Utilities for Hyper-V
Windows 2008 x64 Full Only
Windows 2008 R2 x64 Core or Full Edition to :
Windows 2008 R2 x64 Core or Full Editions. Also from documentation the scenarios that are not supported are :
- The saved state of a virtual machine under one of the following conditions:
- When moving from Hyper-V in Windows Server 2008 to Hyper-V in Windows Server 2008 R2.
- When moving between physical computers that have different processor steppings or vendors—for example, migrating from a computer with an Intel processor to a computer with an AMD processor.
- Virtual machine configuration under one of the following conditions:
- When the number of virtual processors configured for the virtual machine is more than the number of logical processors on the destination server.
- When the memory configured for a virtual machine is greater than the available memory on the destination server.
- Consolidation of physical servers to virtual machines, or consolidation of multiple instances of Hyper-V to one instance.
Friday, February 26, 2010
Hyper-V Live Migration Network Configuration Guide from Microsoft
This guide describes how to configure your network to use the live migration feature of Hyper-V™. It provides a detailed list of the networking configuration requirements for optimal performance and reliability, as well as recommendations for scenarios that do not meet these requirements.http://technet.microsoft.com/en-us/library/ff428137(WS.10).aspx
Sunday, February 14, 2010
Microsoft recommends Increasing VMBus buffer size on Hyper-V for better network throughput
"Your workloads and networking traffic may not need increased buffers; however, these days, 4Mb of RAM isn’t a tremendous amount of memory to invest as an insurance policy against packet loss. Now, if only I could increase a few buffers and alleviate congestion on my daily commute!"http://blogs.technet.com/winserverperformance/archive/2010/02/02/increase-vmbus-buffer-sizes-to-increase-network-throughput-to-guest-vms.aspx
In order to make the change (source above) :
On the Guest OS , In the Network Adapter Properties dialog, select the Details tab. Select Driver Key in the Property pull-down menu as shown in figure 1 (click the images to see a version that's actually readable):
Tuesday, February 9, 2010
Vulnerability in Windows Server 2008 Hyper-V Could Allow Denial of Service - 977894
http://www.microsoft.com/technet/security/Bulletin/MS10-010.mspx
This security update resolves a privately reported vulnerability in Windows Server 2008 Hyper-V and Windows Server 2008 R2 Hyper-V. The vulnerability could allow denial of service if a malformed sequence of machine instructions is run by an authenticated user in one of the guest virtual machines hosted by the Hyper-V server. An attacker must have valid logon credentials and be able to log on locally into a guest virtual machine to exploit this vulnerability. The vulnerability could not be exploited remotely or by anonymous users.
Wednesday, February 3, 2010
Hyper-V Memory Overcommitment in new Service Pack for Windows 2008 R2
http://news.softpedia.com/news/The-Windows-8-Start-Post-RTM-Windows-7-Build-6-1-7700-0-100122-1900-133746.shtml
Windows 2008: Modifying Network Bindings from CLI
With this tool it is now possible to make this via CLI. It can also change NIC binding order for specific protocols.
http://code.msdn.microsoft.com/nvspbind
Parameters are as below:
C:\>nvspbind /?
Hyper-V Network VSP Bind Application 6.1.7690.0.
Copyright (c) Microsoft Corporation. All rights reserved.
Usage: nvspbind [option] [NIC|*] [protocol|*]
Options:
/n display NIC information only
/u unbind switch protocol from specified nic(s)
/b bind switch protocol to specified nic(s)
/d disable binding of specified protocol from specified nic(s)
/e enable binding of specified protocol to specified nic(s)
/r repair bindings on specified nic(s)
/o show NIC order for specified protocol
/+ move specified NIC up in binding order for specified protocol
/- move specified NIC down in binding order for specified protocol
Most options are documented in the readme which downloads with the install.
The NIC connection order options (o, + and -) show the NIC connection order, move NICs up and move NICs down.
Monday, December 28, 2009
"Server manager has detected that the processor on this computer is not compatible with Hyper-V" Error While Enabling Hyper-V Role
"Server manager has detected that the processor on this computer is not compatible with Hyper-V. To install this roll, the processor must have a supported version of hardware-assisted virtualization and that feature must be turned on in the BIOS."
First make sure you have Hardware Assisted Virtualization and DEP turned on BIOS. If you still see this error message after enabling those roles make sure you didn't enable the role using :
start /w ocsetup Microsoft-Hyper-V
If so you need to first uninstall it (start /w ocsetup Microsoft-Hyper-V /uninstall) then install using the GUI (Server Manager -> Add Roles)
Friday, October 30, 2009
SCVMM Unknown Error 0x80338104
VMM does not have appropriate permissions to access the WSMan resources on the vmtest server.
(Unknown error (0x80338104))
Saturday, October 17, 2009
SCVMM Error 403 : %ComputerName; is not a valid network computer name
Error 403 : %ComputerName; is not a valid network computer name
please make sure you are resolving the DNS entry for that host correctly. Especially check /etc/hosts file for any incorrect static entries (that's was the problem in my case)
Friday, August 28, 2009
The battle of hypervisor footprints
http://blogs.technet.com/virtualization/archive/2009/08/12/hypervisor-footprint-debate-part-1-microsoft-hyper-v-server-2008-vmware-esxi-3-5.aspx
http://blogs.technet.com/virtualization/archive/2009/08/14/hypervisor-footprint-debate-part-2-windows-server-2008-hyper-v-vmware-esx-3-5.aspx
http://blogs.technet.com/virtualization/archive/2009/08/17/hypervisor-footprint-debate-part-3-windows-server-2008-hyper-v-vmware-esxi-3-5.aspx
Hyper-V Server 2008 vs ESXi 3.5 | June 2008 - June 2009
Hyper-V: 82MB footprint increase with 26 patches
ESXi: 2.7GB footprint increases with 13 patches
Windows Server 2008 Hyper-V vs ESX 3.5 | January 2008 - June 2009
Hyper-V: 408MB footprint increase with 32 patches
ESX: 3GB footprint increases with 85 patches
Windows Server 2008 Hyper-V vs ESXi 3.5 | January 2008 - June 2009
Hyper-V: 408MB footprint increase with 32 patches
ESX: 2.7GB footprint increases with 13 patches
and now Vmware's official reply :
I'm leaving the final decision to you :)
What's new in SCVMM 2008 R2
Support for new features of Windows Server 2008 R2
Enhanced storage and cluster support
Streamlined process for managing host upgrades:
Other VMM 2008 R2 enhancements
Thursday, August 20, 2009
Required Local OS Firewall Rules for SCVMM and Hyper-V Host Communication
Communication Details For HyperV&SCVMM
In order to manage HyperV Hosts using SCVMM below ports/protocols should be open on the firewall.
VMM Server
80 (HTTP, WS-MAN)
443 (HTTPS, BITS)
8100 (WCF Connections to PowerShell or Admin Console)
SQL Server
1433 (Remote SQL instance connection)
1434 (SQL browser service) - only needed for initial setup
Host / Library
80 (HTTP, WS-MAN)
443 (HTTPS, BITS)
3389 (RDP)
2179 (VMConnect on Hyper-V hosts for single-class console view)5900 (VMRC on Virtual Server hosts)
The list of all ports and protocols can be found in the official MS document :
http://technet.microsoft.com/en-us/library/cc764268.aspx
Most of the FW rules above has been created by the SCVMM Installer and the role setup wizard for IIS,HyperV.
Additionally during the deployment of the SCVMM agent on the HyperV host the SMB-IN 445 should be available on HyperV host because the Agent Installer file has been moved to the ADMIN$ share of the HyperV host.
Necessary Configuration For Remote Management
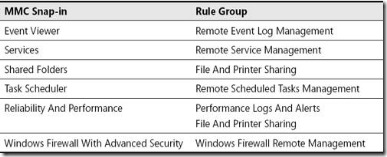
General Rule Groups You Must Enable in Windows Firewall to Allow Remote Management by an MMC Snap-in
In order to manage HyperV hosts remotely enable the below rule groups :
netsh advfirewall firewall set rule group="Windows Firewall Remote Management" new enable=yes
netsh advfirewall firewall set rule group=" Remote Administration" new enable=yes
For Device Manager apart from the rulegroups above you need to enable the GPO for :
Allow remote access to the PnP interface
For Disk Manager :
Make sure VDS service is running and enabled on startup. Also enable the below rule :netsh advfirewall firewall set rule group=" Remote Volume Management" new enable=yes
Also in order to make HP System Management Homepage available enable TCP port 2381 on Hyper Host inbound rules.
Summary of Local Firewall Rules
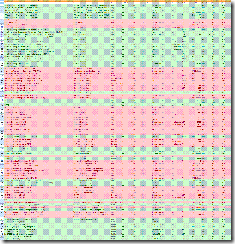
Below images shows all rules enabled on SCVMM and HyperV host to make remote management possible. The default Outbound rule for all profiles is “Allowed”. That’s why only INBOUND rules has been placed inside the document.
SCVMM Input :

Hyper-V Input :
Monday, August 17, 2009
Hyper-V Tagging & Teaming with HP NCU
Yes, finally the first real post of my blog :) This article summarize the NIC Teaming & Tagging support on Hyper-V. Scenarios has been tested on HP Blade systems with HP NCU utility. Windows 2008 Datacenter Core Edition has been used for the parent partition.
In order to check VLAN tagging with teaming 2 scenarios have been tested :
2. NIC Teaming with NCU and Tagging at HyperV Level (NOK)
As stated above only the first scenario works. This scenario creates lots of adapter overhead on the OS level. For instance lets assume that you have 2 physical interfaces which are teamed and you create 4 VLANs on top. After making the necessary configurations you have :
2 Interface for the actual pNICs.
1 Interface for Teamed NIC
4 Interface For the VLANs
4 Interface For the Virtual Switches
This creates some management overhead for the interfaces but this is the only supported scenario by Hyper-V currently.
Also with this setup the parent partition always have L2 access to all VLANs because the virtual network adapter at parent partition level is connected to the Virtual Switch by default. In order to create a External network without parent partition attached you can use the Poweshell scripts mentioned on the below pages.
Also after creating a virtual network you can disable this virtual interface. On server Core :
netsh interface show interface
netsh interface set interface name=”Name of Interface” disabled
In order to understand the networking logic in Hyper-V it’s strongly recommended to check the below document :
http://www.microsoft.com/DOWNLOADS/details.aspx?FamilyID=3fac6d40-d6b5-4658-bc54-62b925ed7eea&displaylang=en
As stated by the above diagram when you bind a virtual network to a physical interface, a Virtual Network Adapter has been created on OS level. This virtual adapter has all the network binding like TCP/IP. After this operation the existing Network Adapter for the pNIC has only a binding for the HyperV Virtual Switch protocol.
In order to make OS level application work over the new created virtual adapter make sure appropriate tagging has been created also on host level.
IMPORTAT NOTE: Make sure you don’t create any Virtual Switch on the pNIC that is used for communication between SCVMM and Hyper-V host. Leave at least one NIC or Teamed Interface for this communication.
NIC Teaming and Tagging with HP NCU
HyperV has NO teaming capability at Hypervisor level like VmWare ESX/ESXi as mentioned in KB968703 (http://support.microsoft.com/kb/968703) :
Since Network Adapter Teaming is only provided by Hardware Vendors, Microsoft does not provide any support for this technology thru Microsoft Product Support Services. As a result, Microsoft may ask that you temporarily disable or remove Network Adapter Teaming software when troubleshooting issues where the teaming software is suspect.
If the problem is resolved by the removal of Network Adapter Teaming software, then further assistance must be obtained thru the Hardware Vendor.
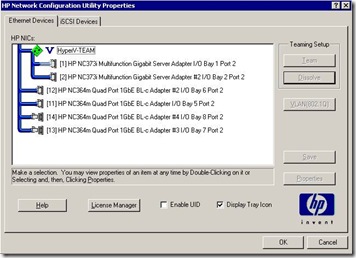
This support has to be maintained at Hardware Level. For HP we used HP NCU for teaming purpose.
IMPORTANT NOTE : HP NCU have to be installed AFTER enabling HyperV role.
http://h20000.www2.hp.com/bc/docs/support/SupportManual/c01663264/c01663264.pdf
http://support.microsoft.com/kb/950792
OS Level Settings For Teaming+Tagging
In order to check HyperV with Teaming + tagging :
2. HyperV role activated with necessary KB Updates.
http://support.microsoft.com/?kbid=950050
http://support.microsoft.com/?kbid=956589
http://support.microsoft.com/?kbid=956774
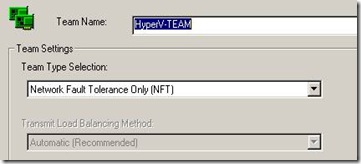
3. Using HpTeam Utility NFT based teaming has been configured.
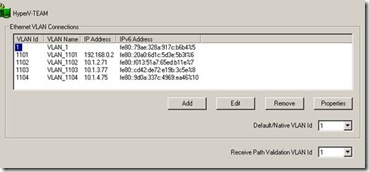
4. NCU Installed together with Broadcom and Intel Drivers. 5. VLAN1,1101,1102,1103,1104 has been setup on the teamed interface.
Hyper-V Level Settings For Teaming+Tagging
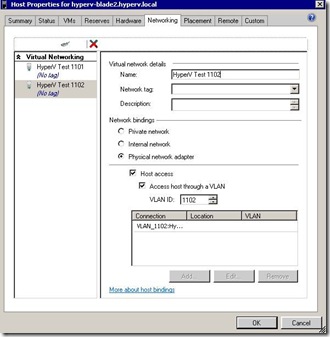
NOTE : Access host through VLAN option enables the parent partition talk with that VLAN.
2. On the HOST created to VMs for testing. Each VM has been connected to different virtual switch as below
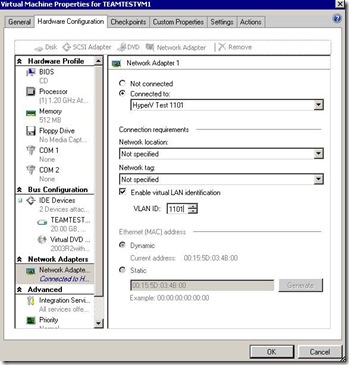
3. After setting tagging both on Host and VM level ping between different VLANs is possible. (The switch has been configured for interVLAN routing)
NIC Teaming with NCU and Tagging at HyperV Level
2. HyperV role activated with necessary KB Updates
http://support.microsoft.com/?kbid=950050
http://support.microsoft.com/?kbid=956589
http://support.microsoft.com/?kbid=956774
3. NCU Installed together with Broadcom and Intel Drivers.
4. Only Teaming has been configured with NCU.
5. A virtual switch has been created at HyperV level and necessary tagging made for the Host Virtual Adapter.
6. Virtual guest machines has also configured with tagged vNICs.
7. Network connectivity between the VMs does NOT work.
