Sunday, August 30, 2009
Tip of the Day : Vmware - Linux Virtual Consoles Keystroke from Vmware
Friday, August 28, 2009
The battle of hypervisor footprints
http://blogs.technet.com/virtualization/archive/2009/08/12/hypervisor-footprint-debate-part-1-microsoft-hyper-v-server-2008-vmware-esxi-3-5.aspx
http://blogs.technet.com/virtualization/archive/2009/08/14/hypervisor-footprint-debate-part-2-windows-server-2008-hyper-v-vmware-esx-3-5.aspx
http://blogs.technet.com/virtualization/archive/2009/08/17/hypervisor-footprint-debate-part-3-windows-server-2008-hyper-v-vmware-esxi-3-5.aspx
Hyper-V Server 2008 vs ESXi 3.5 | June 2008 - June 2009
Hyper-V: 82MB footprint increase with 26 patches
ESXi: 2.7GB footprint increases with 13 patches
Windows Server 2008 Hyper-V vs ESX 3.5 | January 2008 - June 2009
Hyper-V: 408MB footprint increase with 32 patches
ESX: 3GB footprint increases with 85 patches
Windows Server 2008 Hyper-V vs ESXi 3.5 | January 2008 - June 2009
Hyper-V: 408MB footprint increase with 32 patches
ESX: 2.7GB footprint increases with 13 patches
and now Vmware's official reply :
I'm leaving the final decision to you :)
Linux Baby Rocker :)
http://www.youtube.com/watch?v=bYcF_xX2DE8
Source code of the shell script:
#!/bin/sh
while [i= 1]
do
eject
eject t
done
What's new in SCVMM 2008 R2
Support for new features of Windows Server 2008 R2
Enhanced storage and cluster support
Streamlined process for managing host upgrades:
Other VMM 2008 R2 enhancements
Thursday, August 27, 2009
Tip of the Day : Software - Free IMAP/SMTP/POP3 Solution For Windows
http://www.hmailserver.com
The software is open-source and free. The setup is pretty straight forward. Just couple of Next's and Finishes. You can use SQL Compact, MYSQL or MSSQL as the back-end DB. The configuration is also very easy. Just setup your domain and accounts then you are ready to go.
Sunday, August 23, 2009
Tip of the Day : SSHD - How to connect a server using SSH and without entering login credentials
[root@server-a ~]# ssh-keygen -t rsa
Generating public/private rsa key pair.
Enter file in which to save the key (/root/.ssh/id_rsa):
Enter passphrase (empty for no passphrase): --- leave empty
Enter same passphrase again: --- leave empty
Your identification has been saved in /root/.ssh/id_rsa.
Your public key has been saved in /root/.ssh/id_rsa.pub.
The key fingerprint is:
35:ee:f1:53:f6:d7:85:4b:65:c3:68:f0:b6:59:f5:50 root@server-a
[root@server-a ~]# scp .ssh/id_dsa.pub server-b:/root/.ssh/id_dsa_lr.pub
[root@server-b ~]# cd /root/.ssh/
[root@server-b ~]# cat id_dsa_lr.pub >> authorized_keys
[root@servera ~]# ssh server-b
Last login: Mon Sep 3 12:29:09 2007 from X.X.X.X
[root@server-b ~]#
Friday, August 21, 2009
Tip of the day : Linux - Output a specific line
head -150 file_name.txt | tail -1Shows the 150th line inside the file
Thursday, August 20, 2009
Tip of the day : Linux - How to keep commands running in the background after logging out
I'm starting a ping on console. Then I'm exiting console, and would like to return my ping session. How can I do this ?Normally in order to send a command to background and redirect STDOUT & STDERR to a logfile we use :
ping localhost >> /var/log/neco.test 2>&1 &Even if you send a process to the background when you logout/exit from a shell session Linux shell sends a HUP signal and kills that process. So we need to detach this process from shell. At this point the command nohup helps us. nohup detach the process from shell and attach to initd which is the mother process of all :) So we modify our command as below to reach our target :
[2] 27783
nohup ping localhost >> /var/log/neco.test 2>&1 &After this command we can exit the shell and check the status of the STDOUT from the log file :
[1] 27786
tail -f /var/log/neco.testIn order to kill the process we need to use kill command with process id.
64 bytes from necoPC (127.0.0.1): icmp_seq=105 ttl=64 time=0.023 ms
64 bytes from necoPC (127.0.0.1): icmp_seq=106 ttl=64 time=0.022 ms
64 bytes from necoPC (127.0.0.1): icmp_seq=107 ttl=64 time=0.019 ms
Required Local OS Firewall Rules for SCVMM and Hyper-V Host Communication
Communication Details For HyperV&SCVMM
In order to manage HyperV Hosts using SCVMM below ports/protocols should be open on the firewall.
VMM Server
80 (HTTP, WS-MAN)
443 (HTTPS, BITS)
8100 (WCF Connections to PowerShell or Admin Console)
SQL Server
1433 (Remote SQL instance connection)
1434 (SQL browser service) - only needed for initial setup
Host / Library
80 (HTTP, WS-MAN)
443 (HTTPS, BITS)
3389 (RDP)
2179 (VMConnect on Hyper-V hosts for single-class console view)5900 (VMRC on Virtual Server hosts)
The list of all ports and protocols can be found in the official MS document :
http://technet.microsoft.com/en-us/library/cc764268.aspx
Most of the FW rules above has been created by the SCVMM Installer and the role setup wizard for IIS,HyperV.
Additionally during the deployment of the SCVMM agent on the HyperV host the SMB-IN 445 should be available on HyperV host because the Agent Installer file has been moved to the ADMIN$ share of the HyperV host.
Necessary Configuration For Remote Management
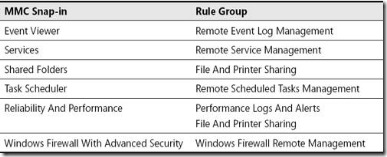
General Rule Groups You Must Enable in Windows Firewall to Allow Remote Management by an MMC Snap-in
In order to manage HyperV hosts remotely enable the below rule groups :
netsh advfirewall firewall set rule group="Windows Firewall Remote Management" new enable=yes
netsh advfirewall firewall set rule group=" Remote Administration" new enable=yes
For Device Manager apart from the rulegroups above you need to enable the GPO for :
Allow remote access to the PnP interface
For Disk Manager :
Make sure VDS service is running and enabled on startup. Also enable the below rule :netsh advfirewall firewall set rule group=" Remote Volume Management" new enable=yes
Also in order to make HP System Management Homepage available enable TCP port 2381 on Hyper Host inbound rules.
Summary of Local Firewall Rules
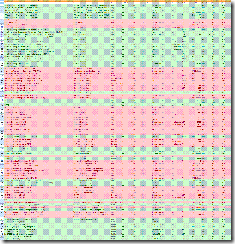
Below images shows all rules enabled on SCVMM and HyperV host to make remote management possible. The default Outbound rule for all profiles is “Allowed”. That’s why only INBOUND rules has been placed inside the document.
SCVMM Input :

Hyper-V Input :
Tip of the day : Networking - How to Find the Files to Backed Up in an UCS Archive on F5 Big IP LTM Load Balancer
Files to be included inside UCS :
grep save.*.file /usr/libdata/configsync/cs.datDirectories to be included inside UCS :
grep save.*.dir /usr/libdata/configsync/cs.datExcluded files from UCS :
grep save.*.ignore /usr/libdata/configsync/cs.datFor more details check the F5 article on : https://support.f5.com/kb/en-us/solutions/public/4000/400/sol4422.html
Wednesday, August 19, 2009
Putting Digg Icon on your Blogger.com/Blogspot.com Posts
<div class='post-header-line-1'/>
 <div class='post-header-line-1'>
<div style='float:right; margin-left:10px;'>
<script type='text/javascript'>
digg_url = '<data:post.url/>';
</script>
<script src='http://digg.com/tools/diggthis.js'
type='text/javascript'>
</script>
</div>
</div>
Oracle 10g AS Webcache Installation on RHEL4
After writing my post on RHCE, I remembered a document I wrote long time ago wrt Oracle 10g AS Webcache on RHEL4. I thought it can be useful so I’m sharing it on my blog.
INSTALLATION OF LINUX OS
Webcache OS : Red Hat Enterprise 4
Webcache SW : Oracle Application Server Web Cache 10g Release 2
systat-5[1].0.5-11.rhel4.i386.rpm : Depending on what packages you have installed on the OS, this utility may not be installed on your system.
HW REQUIREMENTS
· VGA screen, keyboard, mouse
· Any PC which has following specs :
- Supported by RHEL 4
- at least 2 GIG of RAM
- at least 36 GIG HDISK
- at least 3 GIG-E COPPER ETHERNET INTERFACES or 2 GIGE COPPER ETHERNET + 1 10/100 MBIT ETHERNET IFS
The hardware used for the document is HP DL360 G5 with :
Intel(R) Xeon(R) CPU 5140 Quad Core @ 2.33GHz
2 Gig RAM
72*2 RAID 0+1 HDD
HP NC364T PCI Express Quad Port Gigabit
Install of Linux OS
1. Boot your computer with Red Hat Installation CD 1 / DVD.
NOTE : For Text installation of Red Hat. If you only have a keyboard without a mouse, type linux text + ENTER.
Then follow the items in graphical installation (the sequence of graphical and text install is the same)
Graphical installation of Red Hat.
- Press ENTER to begin graphical installation of Red Hat.
- Press Skip to skip media test.
- Click Next
- Select English for Installation Language and click Next
- Select U.S. English(or the appropriate language) for system keyboard and click Next
- Select Manually partition with Disk Druid and click Next
The webcache which are installed on Hp DL360G5 with 2GB RAM and 72*2 (RAID 1+0) disks.
| Device | Mount Point | Type | Size (MB) |
| /dev/cciss/c0d0p1 | /boot | ext3 | 102 |
| /dev/cciss/c0d0p2 | /opt | ext3 | 11719 |
| /dev/cciss/c0d0p3 | / | ext3 | 5373 |
| /dev/cciss/c0d0p5 | /u01 | ext3 | 3891 |
| /dev/cciss/c0d0p6 | swap | 4095 | |
| /dev/cciss/c0d0p7 | /usr | ext3 | 4095 |
| /dev/cciss/c0d0p8 | /var | ext3 | 3891 |
| /dev/cciss/c0d0p9 | /u02 | ext3 | 8087 |
| /dev/cciss/c0d0p10 | /tmp | ext3 | 8189 |
| /dev/cciss/c0d0p11 | /home | ext3 | 8189 |
| /dev/cciss/c0d0p12 | /home2 | ext3 | rest |
- Click Next to complete manual partitioning.
- Leave the boot loader settings as defaults, and click Next.
- Configure Ethernet interfaces
If you have multiple interfaces on your machine it will be best to enable them all by clicking the checkboxes of the required interfaces. Also give an appropriate hostname for the machine. The Quad Ethernet Card is not detected by the system at the initial setup we will install it later after the setup completes. Click Next
- Disable Firewall and SELinux
Disable Firewall and SELinux and click Next. These features are not required by our application. Click Proceed when you have a firewall warning.
- System language is default English
Leave the system language to default English(USA) and click Next
Select correct timezone depending your location.
I selected Europe/Brussels for time zone and click Next
- Enter root password and NEXT
- Customize software packages to be installed
Click Customize software packages to be installed and click Next
Please make sure that the following packages are installed :
gcc-3.4.3-22.1
gcc-c++-3.4.3-22.1
openmotif21-2.1.30-11.RHEL4.4
setarch-1.6-1
pdksh-5.2.14-30
sysstat-5.0.5-1
gnome-libs-1:1.4.1.2.90-44.1
libstdc++-3.4.3-22.1
libstdc++-devel-3.4.3-22.1
compat-libstdc++-296-2.96-132.7.2
compat-db-4.1.25-9
control-center-2.8.0-12
glibc-common-2.3.4-2.9
binutils-2.15.92.0.2-13
make-1:3.80-5
xscreensaver-4.18-5.rhel4.2
NOTE 1 : You can disable unnecessary packages like Web Server, Windows File Server, Printing Support etc.
NOTE 2 : gcc is required during intallation of ORACLE AS. So, even if you go for production install, then Development tools MUST ALSO be installed .
Click Next and Continue to begin installation.
- Reboot after installation completes
After installation completes click Reboot
- Appearance of welcome screen
After the reboot welcome screen will appear. Click Next.
Accept license agreement and click Next.
- Configure correct date and time
Configure correct date and time, click Next.
Configure your display settings and click Next.
- Product registration (is not needed)
There is no need to register the product so
Next screen click Tell me why I need to register.. and click Next.
Next screen click I can not complete registration.. and click Next.
- Creation of system user (not needed)
Don’t create a system user click Next and then Continue.
- Complete post install tasks.
Click Next in the following two screens to complete post install tasks.
By using your credentials log on to the system.
- Installing HP NC364T PCI Express Quad Port Gigabit
1. First download the Quad Card Driver from
http://h18023.www1.hp.com/support/files/networking/us/download/27412.html
2. Install the source RPM package.
# rpm -ivh e1000-<version>.src.rpm
3. Build the binary RPM for the e1000 driver.
# cd /usr/src/redhat
# rpmbuild -bb SPECS/e1000.spec
4. Check for the existence of a current version of the e1000 package as follows
# rpm -q e1000
If an old version of the package exists, the RPM package should be removed.
# rpm -e e1000
Verify that the old e1000 package has been removed as follows:
# rpm -q e1000
5. Install the new RPM package. This installs the e1000 driver and man page.
Do NOT use the U (Upgrade) flag in the RPM command below - previous e1000 drivers must be removed as described in step 4 above before installing this version.# rpm -ivh RPMS/<arch>/e1000-<version>.<arch>.rpm
The e1000.o module is installed in the following directory:
On 2.6 kernels a e1000.ko module will be installed instead of e1000.o/lib/modules/<kernel_version>/kernel/drivers/net
6. Configure your network setting and address using the below config files :
/etc/sysconfig/network-scripts/ifcfg-eth*
/etc/sysconfig/network
8. You can now reboot your server. Upon reboot the network should start with the e1000 driver loaded and the correct network configuration.
To verify that the e1000 driver is loaded use the following command.
# lsmod
If e1000 is listed then the e1000 driver is loaded. You can also verify that the correct e1000 driver is loaded through any of the following methods. Note that version of the driver loaded should be same as that of the package version.;
Look for driver load messages in the system log.
#dmesg | grep Intel
You should see messages of the following type,
Intel(R) PRO/1000 Network Driver - version x.x.x
- Create /usr/system directory and add it to PATH variable.
In this directory we will add additional tools (as root user) which might be very handy.
mkdir /usr/system
then edit /etc/profile and add following line after the line containing :
after pathmunge /usr/X11R6/bin
add following 2 lines :#needed for /usr/system
pathmunge /usr/system after
This will make sure that the /usr/system dir is in your path and that commands put in there will always be executed. Exit the session and relogin the session to make the changes effective. Check with echo $PATH to verify if /usr/system is in your path variable.
- Disable some useless processes with chkconfig
chkconfig --level 2345 cups off
chkconfig --level 2345 sendmail off
INSTALL ORACLE 10GR2 WEBCACHE
Preinstall Tasks for Oracle10gR2 Webcache
- Change the kernel security parameters
Add the following lines to the /etc/sysctl.conf file:
kernel.msgmnb=65535
kernel.msgmni=2878
kernel.msgmax = 8192
kernel.shmmax=4294967295
fs.file-max=206173
kernel.sem = 256 32000 100 142
kernel.shmmni=4096
net.ipv4.ip_local_port_range = 20000 65000
Then run :
/sbin/sysctl –p
Add the following lines to the /etc/security/limits.conf file:
* soft nproc 16384
* hard nproc 16384
* soft nofile 65536
* hard nofile 65536
Create new groups and oracle user (as root)
groupadd oinstall
groupadd dba
groupadd operuseradd -g oinstall -G dba oracle
passwd oracle
Create the directories in which the Oracle software will be installed:
mkdir -p /u01/app/oracle/product/10gr2
chown -R oracle:oinstall /u01
chown -R oracle:oinstall /u02
As oracle user edit the /home/oracle/.bash_profile file and after the line :
“# User specific environment and startup programs “ add following entries :
ORACLE_BASE=/u02
ORACLE_HOME=/u01/oracle/product/10gr2
ORACLE_SID=test
ORACLE_TERM=xterm
export ORACLE_BASE
export ORACLE_HOME
export ORACLE_SID
export ORACLE_TERM
# Set shell search paths
PATH=$PATH:$ORACLE_HOME/bin:$HOME/bin
export PATH
unset USERNAME
Make sure that export PATH and unset USERNAME commands are created as above.
NOTE : We are doing these steps as oracle user
- Transfer and install systat-5[1].0.5-11.rhel4.i386.rpm
Oracle requires sysstat packages to install completely. Check first if it is installed by running the sar (sar is one of the apps installed by sysstat) command.
If the OS cannot find then it has to be reinstalled.
Download systat-5[1].0.5-11.rhel4.i386.rpm and transfer it to the root directory of the WC server.
as root run :
gzip –d sysstat-[1].0.5-11.rhel4.i386.rpm.gz
followed by
rpm –ivh sysstat-5[1].0.5-11.rhel4.i386.rpm
note it is possible that rpm will not detect the [] characters in the rpm filename. In that case first rename sysstat-5[1].0.5-11.rhel4.i386.rpm to sysstat.rpm
mv sysstat-5[1].0.5-11.rhel4.i386.rpm to sysstat.rpm
and then run
rpm –ivh sysstat.rpm
Run sar to check if sysstat installed correctly. if you get the error :
cannot find directory /var/log/sa/sa29 then reboot the machine.
- Transfer oracle SW in /u01/app/oracle/SW directory
Transfer as_linux_x86_webcache_101202.cpio file into /u01/app/oracle/SW and run :
cpio -idmv < as_linux_x86_webcache_101202.cpio
NOTE 1 : You can transfer the cpio file as root user, then move it into ./SW dir and then do
NOTE 2 : Do NOT forget the < between –idmv and as_linux….cpio !chmod 777 as_linux_x86_webcache_101202.cpio
chown oracle:oinstall as_linux_x86_webcache_101202.cpio
NOTE 3 : After decompressing using cpio you can remove the original as_linux_x86_webcache_101202.cpio file in order to save some diskspace
Running RunInstaller
As oracle user open a terminal and then run :
/u01/app/oracle/SW/Disk1/runInstaller
following screen will popup :
- Specify Inventory directory and credentials.
IMPORTANT : Change the default /u02/oraInventory to : /u01/app/oracle
IMPORTANT : Make sure that the Operating System group name is oinstall AND NOT dba
Then click NEXT.
- Run /u01/app/oracle/orainstRoot.sh
Important : A popup window will appear telling you need to run /u01/app/oracle/orainstRoot.sh as root before pushing CONTINUE. So open a terminal and su – to root and execute that script.
As root (so in a different terminal), run /u01/app/oracle/orainstRoot.sh before proceeding with the install.[root@wc oraInventory]# /u02/oraInventory/orainstRoot.sh
Creating the Oracle inventory pointer file (/etc/oraInst.loc)
Changing groupname of /u02/oraInventory to oinstall.
NOTE : If you get the message to run u02/oraInventory/orainstRoot.sh then this means that at the beginning or oracle you aceepted the default values which is not recommended. In that case restart the install of oracle using the correct install directory
Click continue after running run /u01/app/oracle/orainstRoot.sh
Specify file locationsLeave the Source path as /u01/app/oracle/SW/Disk1/stage/products.xml
Leave destination name as oracleas1
Change Destination path to : /u01/oracle/product/10gr2
NOTE : This is the same as ORACLE_HOME. (do : set | grep ORACLE as oracle user in a separate terminal to check)
- Specify Web Cache Admin Password (at least one char should be numeric)
- Product-specific prerequisite checks
The installer will now execute some checks.
IMPORTANT NOTE : in case you get a warning in the prerequisite checks
If you did not install sysstat-5-XX before as mentioned in the manual above then you will get a warning.
Depending on your installed packages during LINUX RHEL 4 OS, it might be that sysstat-5- is not installed.This means that the checks will result in following error :
“Checking recommended operating system packages” with status = WARNING.
Further examination of the window tells us that sysstat-5-0.5.-1 is not installed.- Begin Oracle Universal Cache Top 10.1.2.1.0 installation
Click Install to begin installation.
- After the installation execute /u01/oracle/product/10gr2/root.sh as root
So open new terminal window and as root then run/u01/oracle/product/10gr2/root.sh
accept the default /usr/local/bin path
Running Oracle10 root.sh script...
The following environment variables are set as:
ORACLE_OWNER= oracle
ORACLE_HOME= /u01/oracle/product/10gr2
Enter the full pathname of the local bin directory: [/usr/local/bin]:
Copying dbhome to /usr/local/bin ...
Copying oraenv to /usr/local/bin ...
Copying coraenv to /usr/local/bin ...Creating /etc/oratab file...
Adding entry to /etc/oratab file...
Entries will be added to the /etc/oratab file as needed by Database Configuration Assistant when a database is created Finished running generic part of root.sh script.
Now product-specific root actions will be performed.
After execution of the root.sh script, click OK
Click exit to finish installation
Post-install Tasks for Oracle10gR2 Webcache
- Change the default runlevel to 3
as root user, vi /etc/inittab and look for the line :
id:5:initdefault:
and modify it to
id:3:initdefault:
runlevel 3 uses less memory + reboot the machine
- Create some aliases (optional):
As root in /etc/bashrc, look for following line …
#Even for non-interactive, non-login shells
… and insert following lines.
alias xmlvid='vi /u01/oracle/product/10gr2/webcache/webcache.xml'
alias vi='vi'
alias gobin='cd /u01/oracle/product/10gr2/webcache/bin'
alias goconf='cd /u01/oracle/product/10gr2/webcache'
alias gologs='cd /u01/oracle/product/10gr2/webcache/logs'
alias gobin='cd /u01/oracle/product/10gr2/webcache/bin'
alias eventlog='tail -f /u01/oracle/product/10gr2/webcache/logs/event_log'
alias accesslog='tail -f /u01/oracle/product/10gr2/webcache/logs/access_log'
alias wcstatus='/u01/oracle/product/10gr2/webcache/bin/webcachectl status'
alias wcstart='/u01/oracle/product/10gr2/webcache/bin/webcachectl start'
alias wcstop='/u01/oracle/product/10gr2/webcache/bin/webcachectl stop'
By doing this, these aliases will be visible both for root and oracle users
As oracle user do wcstop.
Check with wcstatus if all 3 processes are stopped
Change privilege rights of webcached binary
In the “gobin”(see aliases) directory the privileges of wecached by default are :
In order to open ports lower then 1024 (port 80) you need to change ownerschip as root as follows :#ls –al webcached :
-rwxr-x--- 1 oracle oinstall 17074 Aug 21 17:01 webcached
[root@wc]# chown root webcached
[root@wc]# chmod 4750 webcached
After this operation the privileges of webached MUST look as follows : (of course, date can be different)
-rwsr-x--- 1 root oinstall 3565001 Aug 21 17:01 webcached
NOT doing this will result that webcached will not have the prvileges to open port 80 ( < 1024) and will not start.
- Running webcached with Root Privilege
Webcached must run as the root privilege in the following cases:
· Privileged port numbers less than 1024 are being used for OracleAS Web Cache listening ports.
· There are more than 1,024 file descriptors being used for connections to OracleAS Web Cache.
· The current opmnctl or webcachectl user does not match the configured user in the Process Identity page (Properties > Process Identity) of OracleAS Web Cache Manager.
To run webcached with the root privilege:
1. Change the process identity of the OracleAS Web Cache processes.
To establish the process identity of a restricted user first connect to the WC from http://localhost:9400 and:
a. In the navigator frame, select Properties > Process Identity.
The Process Identity page appears in the right pane.
b. In the Process Identity page, choose Change IDs.
The Change Process Identity dialog box appears.
c. Enter the new user in the New User ID field and the group ID of the user in the New Group ID field.
d. Click Submit.
e. In the OracleAS Web Cache Manager main window, click Apply Changes.
2. Use the webcache_setuser.sh script as follows to run OracleAS Web Cache as a different user, such as root/root, and add set-user ID permission to the webcached executable:
3. webcache_setuser.sh setidentity <user_ID
4. where <user_ID> is the user you specified in the New User ID field of the Process Identity page.
For example, to run OracleAS Web Cache as root/root, enter:
webcache_setuser.sh setidentity root
5. Log out of the computer, and re-login as the user configured in the Process Identity page.
Make sure that alls WC processes are stopped ( wcstatus or ps –ef | grep oracle) and reboot WC.
Then you will be sure that WC is started up in runlevel 3.
Start WC + connect to management port 9400
Make sure that WC processes are running
Login as root and do wcstatus. if not running then type wcstart and check again if they are running.
Now from any windows machine that has IP connectivity to the WC, open the browser and type
at the right-top of the window screen, select “LOG on to OracleAS Web Cache Manager”
NOTE : The default listening port of the WC for management has been changed from 4000 to 9400.
Optimizing your WEBCachehttp://download-west.oracle.com/docs/cd/B14099_19/core.1012/b14001/optwebc.htm#CIHJFBDI
Troubleshooting your WEBcache
http://download-uk.oracle.com/docs/cd/B14099_02/caching.1012/b14046/trouble.htm
Tuesday, August 18, 2009
RHCE – Day 1
Before starting this series, I want to tell you a boring story about myself. The story begins at 2000 when I was a high school student making web design/programming to earn my pocket money:) These days I recognised a web page called Brainbench which makes online exams for certification. I passed their exam to get ceritified for HTML 4.0
From that point on, I really understood the necessity of certification because the preparation process gives you much more then the paper you earn at the end. After that, my next step was MCSE 2000. I remember that I was studying the exam on my Intel Pentium 133 running Win2k like a turtle. The preparation phase was funny but in the end as an high school student I didn’t have enough money to pay for the exam fees, so unfortunately I didn’t have a chance to be MCSE at that age :(
And then comes the collage years. This time I have a new target : Networking and Cisco Certifications. And now I have enough money coming from the scholarships ;-) After 3 years of self paced and computer based preparation and with the help of Boson Netsim and Dynamips I passed all the exams (In total 5) that are necessary for CCNA & CCNP + 1 for CCIP (QoS Exam)
After graduating from school I applied a job in a big telco vendor. They were so suprised to see a new graduate with CCNA, CCNP. As there were a lot of paper certified people around, they want to verify this. After a very long technical interview they got convinced and hired me.
Certification has great importance in my life. I found certification as a great tool to advance expertise about technical areas. Currently I have IWA HTML 4.0, CCNA, CCNP, CCIP, MCTS Windows Server 2008 Active Directory: Configuration, MCTS Windows Server 2008 Network Infrastructure: Configuration, MCTS Windows Server Virtualization Hyper-V and MCITP : Windows 2008 Server Admin. All of these certification tacks helped me build knowledge on varios technologies in a very proper way. But will I stop ? Of course not :) Next step is RHCE (RedHat Certified Engineer)
Why RHCE ?
- As a network and system admin the middleware I was working on is mostly UNIX based (Redhat, Solaris, Secureplatform etc..) I have enough hands on and expertise but I don’t have a real proof.
- My interview with Google reminded me the importance of Linux again.
- RHCE is lab based not one of these paper certifications.
- One of the most recognised certification by the industry.
Enough pep talk let’s begin. First the preparation materials :
1. RHEL 5 Unleashed by Tommy Fox
2. RHCE Red Hat Certified Engineer Linux Study Guide (Exam RH302), Fifth Edition byMichael Jang
3. Slides from RH033, RH133, RH253 Classes
and the tools :
1. VmWare Workstation/Server for my laptop prep.
2. Vmware ESXi for the lab. (maybe also Hyper-V with RH Integration tools)
and of course RHEL5 iso from RHN and a new wallpaper for motivation :D
http://spinix.deviantart.com/art/LINUX-CCCP-84492543
Installation Methods
CD/DVD-ROM : Classical method for installing
Hard Disk : Requires an HD partition(xt2/3,vfat) accessible by the installer.
Network Install : NFS, FTP or HTTP based using PXE/Boot.iso
Kickstart : Unattended method of installation
NOTE : Boot.iso file can be located under RHELInstall CD1 / DVD ./images folder.
In order to choose for an installation method use “linux askmethod” at the boot prompt


Install Phases :
- Select Language
- Select Keyboard Layout
- Installation number. (This allows us to use additional components like virtualization)
- Partition layout and RAID
IMPORTANT NOTE : If /boot or /boot/efi is a RAID. It must be RAID1.
- GRUB (Boot loader) config
- Network Config
- Packages to be installed
After Install those 2 files are created :
1. /root/install.log -- Install Log File
2. /root/anaconda-ks.cfg -- Sample Kickstart File based on the parameters used during the installation. I will examine this file in a future session.
Yes I know this was a less technical more personal session but next days I will enrich the content and add more notes about my preparation track. Hope to see you in the next part of the RHCE series.
Monday, August 17, 2009
Blogspot.com & Windows Live Writer & Images
I updated my Hyper-V post using Windows Live Writer. My first trial resulted with : HTTP 403 (Not Authorized) message. After a quick search in my dear friend Google, I learned that you need to create a Web Album under Picasa Web Albums (also a Google product) named : “Windows Live Writer” to overcome this issue.
Hyper-V Tagging & Teaming with HP NCU
Yes, finally the first real post of my blog :) This article summarize the NIC Teaming & Tagging support on Hyper-V. Scenarios has been tested on HP Blade systems with HP NCU utility. Windows 2008 Datacenter Core Edition has been used for the parent partition.
In order to check VLAN tagging with teaming 2 scenarios have been tested :
2. NIC Teaming with NCU and Tagging at HyperV Level (NOK)
As stated above only the first scenario works. This scenario creates lots of adapter overhead on the OS level. For instance lets assume that you have 2 physical interfaces which are teamed and you create 4 VLANs on top. After making the necessary configurations you have :
2 Interface for the actual pNICs.
1 Interface for Teamed NIC
4 Interface For the VLANs
4 Interface For the Virtual Switches
This creates some management overhead for the interfaces but this is the only supported scenario by Hyper-V currently.
Also with this setup the parent partition always have L2 access to all VLANs because the virtual network adapter at parent partition level is connected to the Virtual Switch by default. In order to create a External network without parent partition attached you can use the Poweshell scripts mentioned on the below pages.
Also after creating a virtual network you can disable this virtual interface. On server Core :
netsh interface show interface
netsh interface set interface name=”Name of Interface” disabled
In order to understand the networking logic in Hyper-V it’s strongly recommended to check the below document :
http://www.microsoft.com/DOWNLOADS/details.aspx?FamilyID=3fac6d40-d6b5-4658-bc54-62b925ed7eea&displaylang=en
As stated by the above diagram when you bind a virtual network to a physical interface, a Virtual Network Adapter has been created on OS level. This virtual adapter has all the network binding like TCP/IP. After this operation the existing Network Adapter for the pNIC has only a binding for the HyperV Virtual Switch protocol.
In order to make OS level application work over the new created virtual adapter make sure appropriate tagging has been created also on host level.
IMPORTAT NOTE: Make sure you don’t create any Virtual Switch on the pNIC that is used for communication between SCVMM and Hyper-V host. Leave at least one NIC or Teamed Interface for this communication.
NIC Teaming and Tagging with HP NCU
HyperV has NO teaming capability at Hypervisor level like VmWare ESX/ESXi as mentioned in KB968703 (http://support.microsoft.com/kb/968703) :
Since Network Adapter Teaming is only provided by Hardware Vendors, Microsoft does not provide any support for this technology thru Microsoft Product Support Services. As a result, Microsoft may ask that you temporarily disable or remove Network Adapter Teaming software when troubleshooting issues where the teaming software is suspect.
If the problem is resolved by the removal of Network Adapter Teaming software, then further assistance must be obtained thru the Hardware Vendor.
This support has to be maintained at Hardware Level. For HP we used HP NCU for teaming purpose.
IMPORTANT NOTE : HP NCU have to be installed AFTER enabling HyperV role.
http://h20000.www2.hp.com/bc/docs/support/SupportManual/c01663264/c01663264.pdf
http://support.microsoft.com/kb/950792
OS Level Settings For Teaming+Tagging
In order to check HyperV with Teaming + tagging :
2. HyperV role activated with necessary KB Updates.
http://support.microsoft.com/?kbid=950050
http://support.microsoft.com/?kbid=956589
http://support.microsoft.com/?kbid=956774
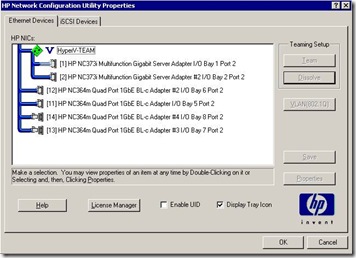
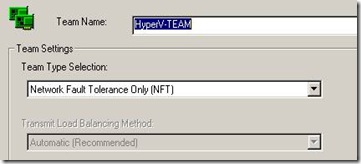
3. Using HpTeam Utility NFT based teaming has been configured.
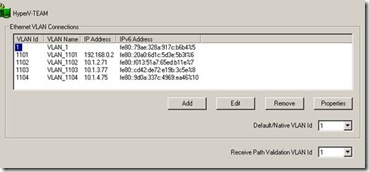
4. NCU Installed together with Broadcom and Intel Drivers. 5. VLAN1,1101,1102,1103,1104 has been setup on the teamed interface.
Hyper-V Level Settings For Teaming+Tagging
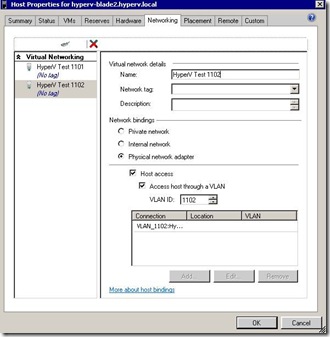
NOTE : Access host through VLAN option enables the parent partition talk with that VLAN.
2. On the HOST created to VMs for testing. Each VM has been connected to different virtual switch as below
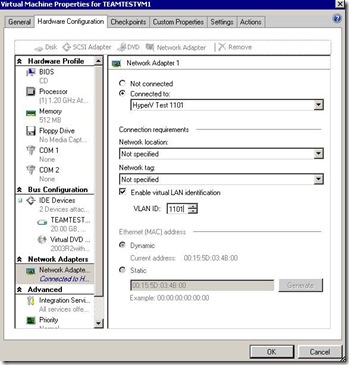
3. After setting tagging both on Host and VM level ping between different VLANs is possible. (The switch has been configured for interVLAN routing)
NIC Teaming with NCU and Tagging at HyperV Level
2. HyperV role activated with necessary KB Updates
http://support.microsoft.com/?kbid=950050
http://support.microsoft.com/?kbid=956589
http://support.microsoft.com/?kbid=956774
3. NCU Installed together with Broadcom and Intel Drivers.
4. Only Teaming has been configured with NCU.
5. A virtual switch has been created at HyperV level and necessary tagging made for the Host Virtual Adapter.
6. Virtual guest machines has also configured with tagged vNICs.
7. Network connectivity between the VMs does NOT work.
Sunday, August 16, 2009
To Blog or Not to Blog
He is so convincing that, from that time on I decided take daily notes on my blog instead of taking them locally on my laptop. One of my mentors told me that your knowledge has no meaning until you transfer it to others.(He is not Kung fu Tzu) This blog will be a tool to make my knowhow more meaningful :)
To be honest, currently I have no idea what will be the content of the next post. Let's see what will tomorrow bring to us ;-)
NOTE : It's a strange feeling to know that none will read this post :)

